A Memo to Deploy Hadoop Cluster in Hydra Lab
This is an article for the UTK EECS students who want to use Hydra lab (or similar school-operated lab) to set up a Hadoop cluster and process big data.
A Brief Review of Hydra Lab Environment
Hydra lab is one of the most frequent use lab in the EECS department. The computer’s hardware is absolutely powerful enough to deploy a small Hadoop cluster. A typical cluster storage capacity (30 Hydra machines) is around 7TB, which only occupies 50% of the total storage in the lab.
Besides the hardware details, several operating system (Ubuntu 12.04 LTS) deployment is very useful to help us quickly deploy a Hadoop cluster.
First, the /home/netid directory is actually a networked file system directory. In other words, if you copy a file to /home/netid/ directory via Hydra2 machine, then every other machine can access the data from the same directory path.
Second, the /home/netid directory has quota limitation that the maximum storage is 2GB per user. So your home directory is not enough to support a Hadoop cluster which may contain data in terrabyte size. However, /local_scratch is the per-machine directory that you can use as much as you want. Apparently, this directory is shared with others, but you can reach 500GB disk size if necessary.
Third, unfortunately, the /local_scratch directory will be deleted within two weeks if there is no data change. So it’s a good idea to touch the path on each machine every couple of days.
Fouth, the Java environment root path is located in /usr/lib/jvm/java-6-openjdk, which is different from a typical Ubuntu 12.04 LTS system after installing Java.
Fifth, the DNSs of the Hydra lab’s machines are very straightforward. For instance, the name of the Hydra machines are Hydra1 – Hydra30, so the DNSs are hydra1.eecs.utk.edu – hydra30.eecs.utk.edu.
Step-by-step Deployment
After we completely understand the features of Hydra lab, we can take advantages of them to quickly setup a Hadoop cluster.
Step 1. Download Hadoop
To obtain a latest version of Hadoop software stack, you may want to use this link. There are multiple versions, but I would recommend you to use a stable version, for instance, Hadoop-1.2.1. In this article, I would use Hadoop-1.2.1 as the example.
You may download the Hadoop package into your /home/netid directory and I would recommend you to do so, because the /home/netid directory can be accessed by any Hydra machine under the same location, meaning that you do not need to copy the Hadoop package to every single machine in Hydra lab.
Step 2. Configure Hadoop Environment
The hadoop-env.sh file contains the Hadoop environment parameters, among which the most important parameter is the JAVA_HOME parameter. So edit the ./conf/hadoop-env.sh file by adding the following information.
1 | export JAVA_HOME=/usr/lib/jvm/java-6-openjdk |
Besides this parameter, where to store the log file should also be in consideration. Hadoop will generate lots of logs, but our /home/netid directory has quota limitation. So we have to relocate the log files into the /local_scratch/. Add the following line into the hadoop-env.sh will change it.
1 | export HADOOP_LOG_DIR=/local_scratch/netid/hadoop/logs |
Step 3. Configure Core Site
The core site defines some important parameters related to the whole system’s work. For instance the hadoop.tmp.dir and the fs.default.name, which defines the temporary directory and master or namenode for the whole system. The core site configuration file is the ./conf/core-site.xml, and you can use the following XML block.
1 | <configuration> |
Step 4. Configure HDFS Site
As to the HDFS, three very important parameters need to be set in order to make sure the cluster in Hydra lab works properly. The three parameter are the following:
dfs.replication: the number of replications.dfs.name.dir: the place for the namenode to maintain all the files in the distributed file system.dfs.data.dir: the place to store the data content on the slave nodes.
The HDFS site configuration is via the ./conf/hdfs-site.xml file. So add the following XML block will apply the changes.
1 | <configuration> |
Step 5. Configure the MapReduce Site
The MapReduce Site information is mainly about the job tracker and its TCP port. So the configuration is simply edit the ./conf/mapred-site.xml through the following XML block.
1 | <configuration> |
Step 6. Configure Master and Slaves
Typically, one master and several slave nodes are used in the Hadoop system. So we need to tell the Hadoop system which one is master and which nodes are slaves. In ./conf/masters and ./conf/slaves files, you can list the master and slaves accordingly. For instance, the ./conf/masters can be the following.
1 | hydra1.eecs.utk.edu |
After finsihing the above five steps, your Hadoop cluster in Hydra lab is ready to run.
Start the Cluster
If you are using the cluster for the first time, you will need to format the namenode by the following command.
1 | $ ./bin/hadoop namenode -format |
Two steps should be followed to start the cluster. The first one is to start DFS through the following command.
1 | $ ./bin/start-dfs.sh |
Then you will see your terminal screen keeps popping message to write log into your HADOOP_LOG_DIR.
Then, you need to start the Map Reduce framework by execute the following command.
1 | $ ./bin/start-mapred.sh |
Similarly, you will see the terminal screen keeps saying to write log to your HADOOP_LOG_DIR.
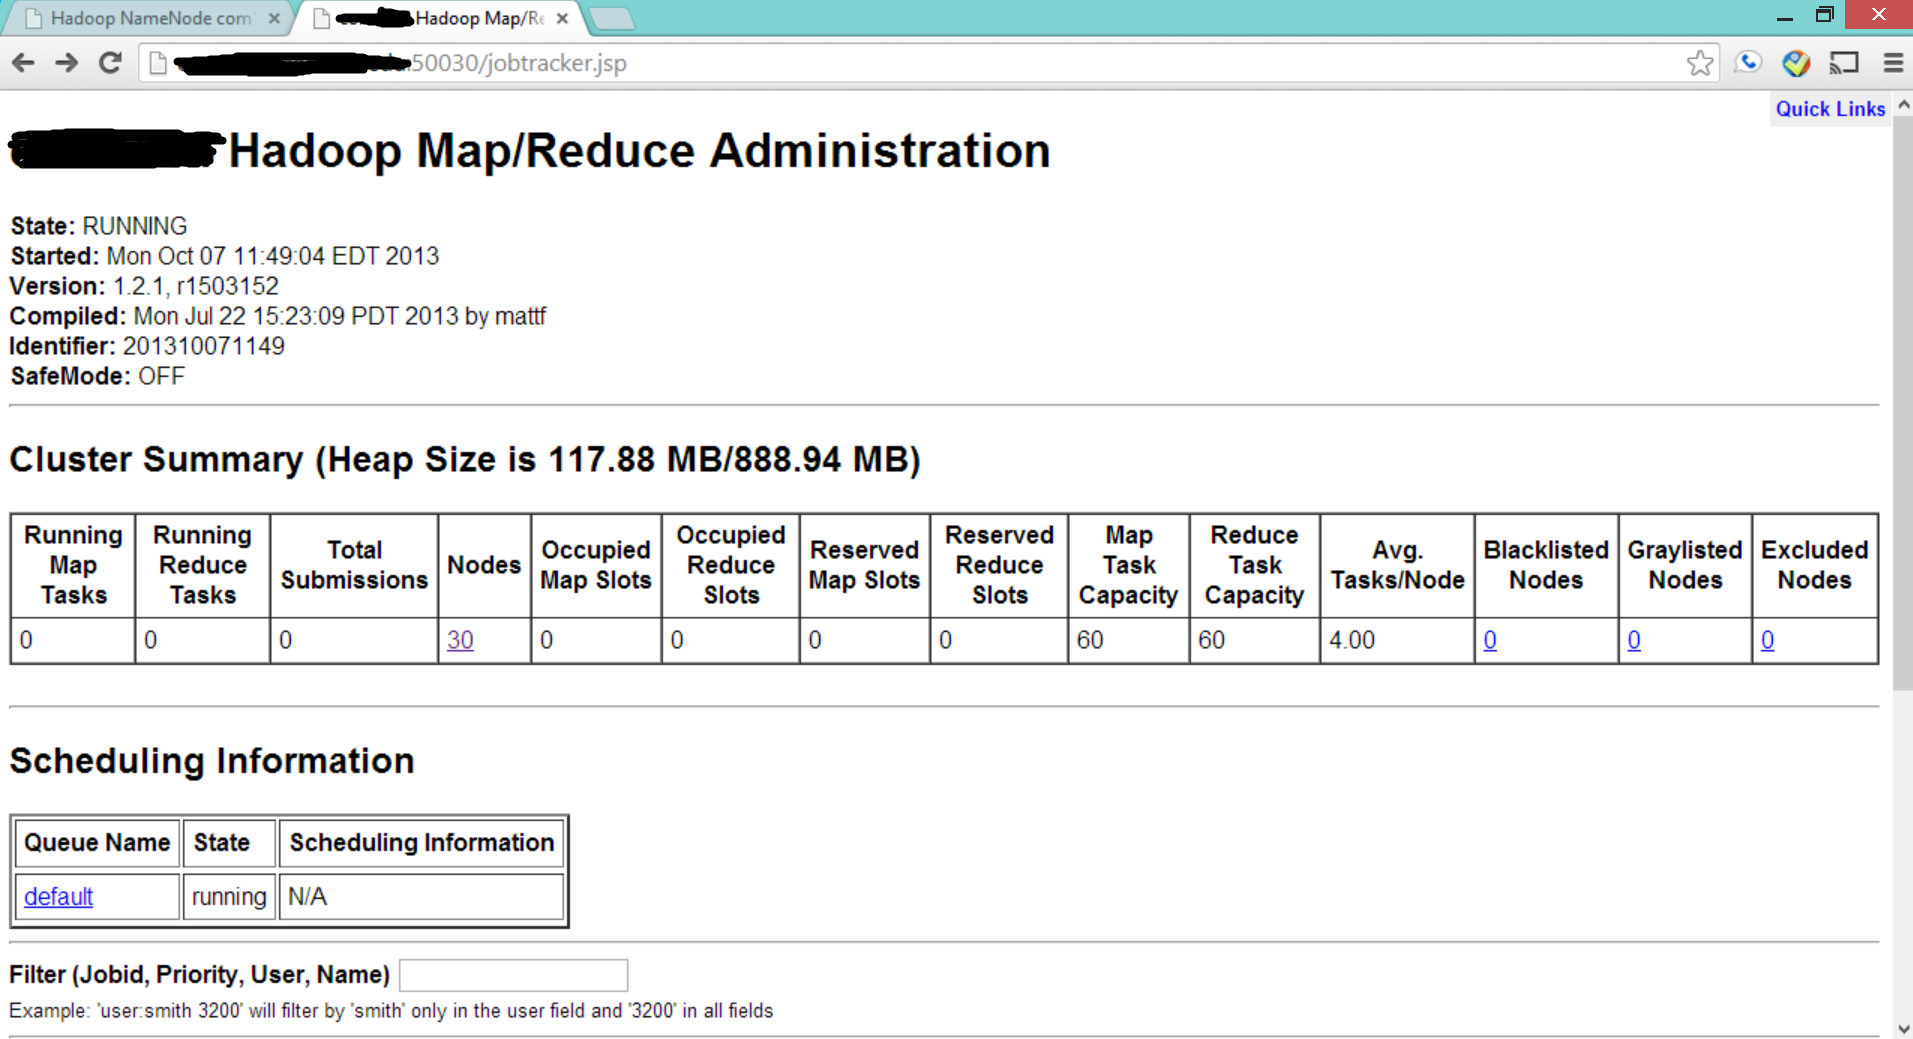
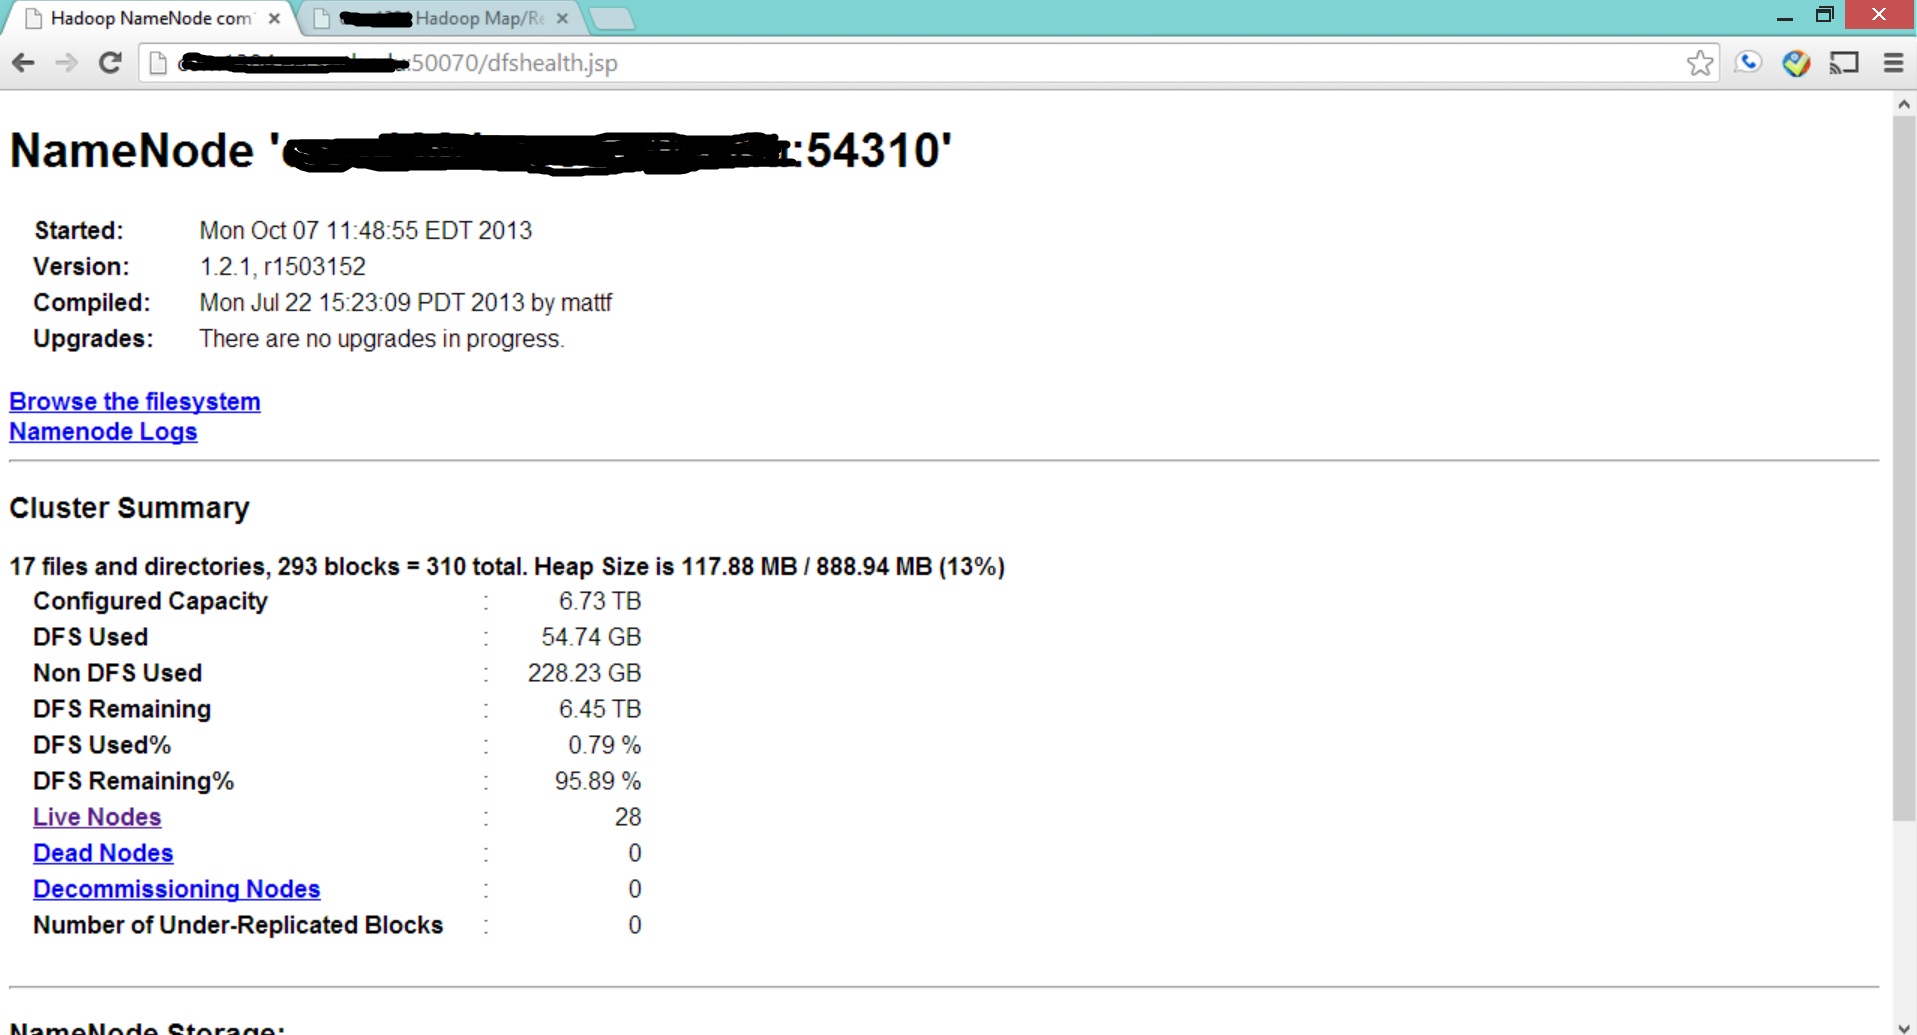
Finally, if you go to your web browser, and check the following two pages, which contains HDFS and MapReduce status details. You will see if your cluster has been started.
1 | http://hydra1.eecs.utk.edu:50030 |
Two demo screenshots are shown in the following:
Validate the Cluster by Sample Application
By default, Hadoop-1.2.1 provides a jar package which contains some default examples of Map/Reduce applications. Therefore, we can use one of those to validate if the whole system is working correctly.
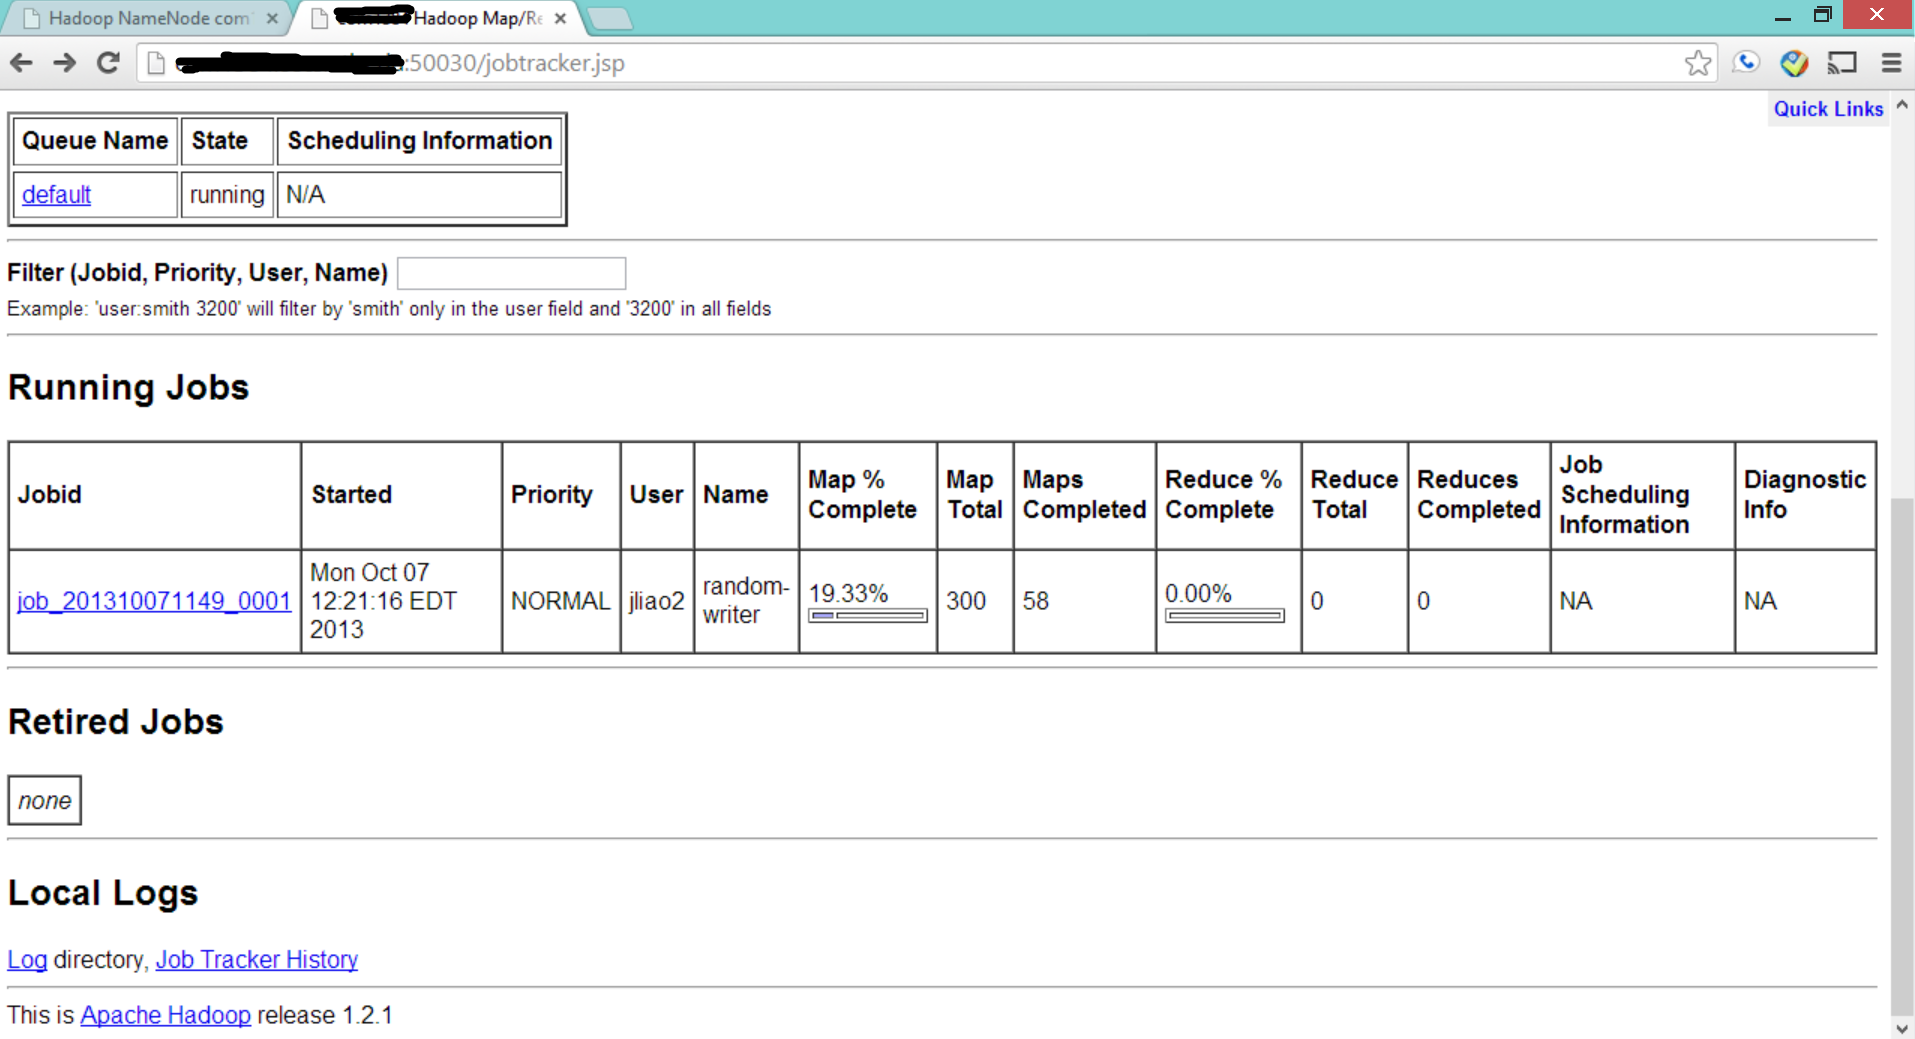
In this example, we use randomwrite, which write 10GB data into the HDFS via Map/Reduce framework. You can simply execute the following command to initiate the task.
1 | $ ./bin/hadoop jar hadoop-examples-1.2.1.jar randomwrite /data/out |
Note that the output directory /data/out is in HDFS, not in the any local machine.
If you check the website again, you will see the ongoing job is reflected on the webpage.
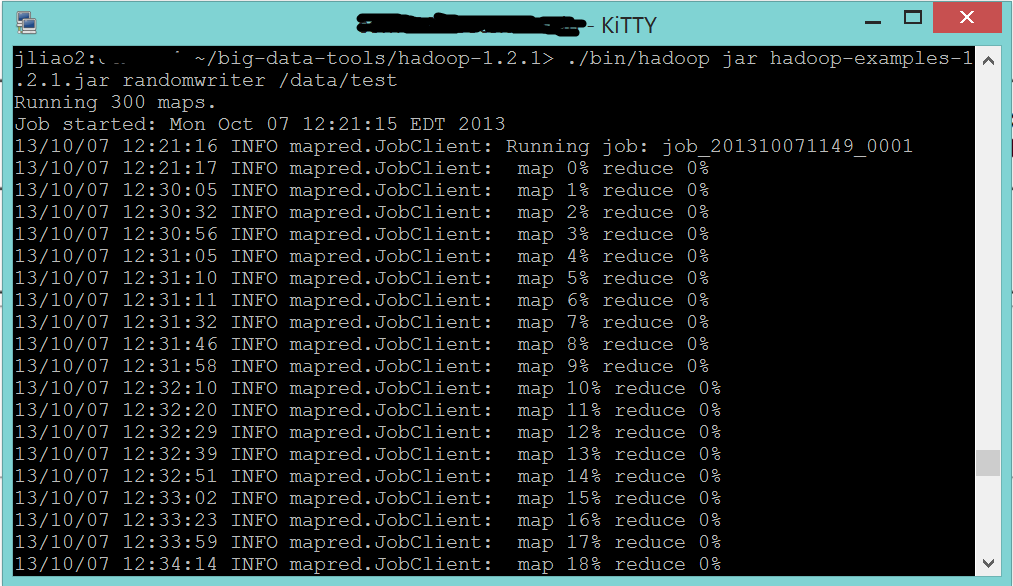
Additionally, you can see the progress of this map/reduce task from your terminal windows.
Special Notes
HDFS Basic Commands
HDFS is a distributed file system and its shell-like commands are close to the typical Linux shell command. The following basic commands are from the official site, which I think is quite useful.
ls, to list a directory, usage: ./bin/hadoop fs -ls [args]mkdir, to create a new directory or file, usage: ./bin/hadoop fs -mkdir [args]mv, to move a directory or file from one place to another, usage: ./bin/hadoop fs - mv [args]rm, to remove a directory or file, usage: ./bin/hadoop fs -rm [args]cp, to copy a drectory or file from one place to another, usage: ./bin/hadoop fs -cp [args]put, to copy from local to HDFS, usage: ./bin/hadoop fs -put [args]get, to copy from HDFS to local, usage: ./bin/hadoop fs -get [args]
SSH Permission Problem
Some of the errors comes from the SSH access permission problem. Specifically, you may not be able to SSH directly from Hydra1 to any other Hydra machines, in other words, it requires your netid and password to do so.
If this issue happens, you may need to create an SSH public key without encrpted phrases from any Hydra machine, say hydra1, and copy this public key to any other machine. Note that, your /home/netid directory is in networked file system, so this one time key copy resolve all the issues between any two machines inside the department’s infrastructure. The following commands should help.
1 | $ ssh-keygen -t rsa -C "" |
When it asks for the filename to save the key, you can either use the default one by clicking enter key or give a new name. I use the default name /home/netid/.ssh/id_rsa here.
Next, you copy key to any other Hydra machine, say hydra7.eecs.utk.edu. Use the following commands.
1 | $ ssh-copy-id -i /home/netid/.ssh/id_rsa.pub hydra7.eecs.utk.edu |
You may need to enter your password, but it should be the last time. After this, you should be restart your Hadoop cluster very smoothly.