Frankly speaking, authentication is my least favorite thing to setup and get it running correctly. The OAuth authentication schemes brings some complicated concepts into our day-to-day job. Aspnet Core’s middleware already encapsulated most of the logic but you still see people asking how to setup Azure Active Directory Authentication or other similar authentication scheme correctly.
Search keywords like openid connect, jwt bearer token, azure ad auth should provide you plentity of results to start with. However, you cannot avoid implement those key components to valdiate tokens, get user claims, token cache etc. Every web app we build, we will have to implement the same thing to protect the app.
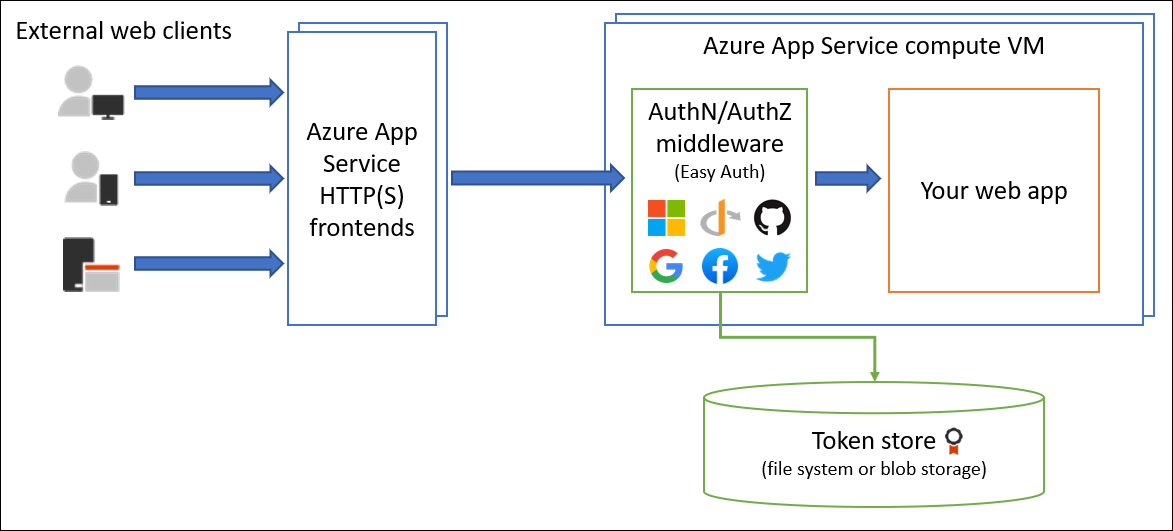
Azure App Service has released a feature Authentication/Authorization a while ago, but this is the first time to try it out in my work when I try to setup a new service. I decided to not implement the authentication logic but use the provided authentication mechanism by Azure App Service.
The following three articles by Azure should provide you the best knowledge to setup correctly and make it work. I would strongly suggest you to read through them if you want to setup the easy auth in your app service.
As soon as you are done with the setup, you are done with the authentication part. Your web app should redirect user to sign-in automatically without you code anything.
The next step is Authorization. Notice that authorization is totally different from authentication, it happens after the user is authenticated. You might want to check if the user belongs to certain group before let them execute certain REST API. This article uses a role-based authorization as an exmaple how you can integrate authorization when you choose to use App Service Authentication.
If you are using ASP.NET 4.6, the user principal claims should be populated automatically. However, if you are using Aspnet Core or Node.js, you would have to write some extra logic to handle it as the user claims are passed through your request headers. In this article we use Aspnet Core 2.1.
First of all, two import headers:
X-MS-CLIENT-PRINCIPAL-IDP. This tells you which authentication provider is used by the user, such as Azure Active Directory (value is aad).
X-MS-CLIENT-PRINCIPAL. This is a base64 encoded string of user claims.
So the first thing is to read the user principal claims from the header value and set the context.User object.
publicasync Task InvokeAsync(HttpContext context, RequestDelegate next) { var claims = new List<Claim>();
// Authorize after the user has been authenticated by App Service Authentication Service if (context.Request.Headers.ContainsKey(XMsClientPrincipalIdp)) { if (context.Request.Headers.ContainsKey(XMsClientPrincipal)) { var clientPrincipal = JsonConvert.DeserializeObject<JObject>( Encoding.UTF8.GetString(Convert.FromBase64String(context.Request.Headers[XMsClientPrincipal].FirstOrDefault()))); foreach (var claimObj in clientPrincipal["claims"].ToObject<JObject[]>()) { claims.Add(new Claim(claimObj["typ"].ToString(), claimObj["val"].ToString())); } } context.User = new ClaimsPrincipal(new ClaimsIdentity(claims)); }
await next(context); } }
Then you can setup a appsettings.roles.json file where you can put security groups in the file.
To apply the roles in the IConfiguration object, you will need to let Aspnet Core code know how to apply it. Note that there is a Azure KeyVault part in the code. This is used for Managed Service Identity (MSI) where you do not need to provide any master key to access your keyvault both in local development and production. I really like this feature that makes the development and production more secure. If you want to integrated Managed service Identity (MSI) into your web app, follow this instruction.
publicstatic IWebHostBuilder CreateWebHostBuilder(string[] args) => WebHost.CreateDefaultBuilder(args) .UseStartup<Startup>() .UseApplicationInsights() .ConfigureAppConfiguration((context, builder) => { builder.SetBasePath(Directory.GetCurrentDirectory()); builder.AddJsonFile("appsettings.roles.json", optional: false, reloadOnChange: true); var config = builder.Build(); var tokenProvider = new AzureServiceTokenProvider(); var kvClient = new KeyVaultClient( (authority, resource, scope) => tokenProvider.KeyVaultTokenCallback(authority, resource, scope)); builder.AddAzureKeyVault(config["KeyVault:Url"], kvClient, new DefaultKeyVaultSecretManager()); }); }
Now, we can extend the InvokeAsync method above in the middleware to include the security groups and roles. After we populate the context.User, we are looking into Azure Active Directory and check the user’s security groups, then intersect with our definition in the appsettings.roles.json. If there is an intersection, we should populate the corresponding roles into the user claims. Finally, CanAccessApi method will decide if the user has permission to access certain api based on the roles of the user. If the user is not able to access the API, 401 UnAuthorized is returned.
publicasync Task InvokeAsync(HttpContext context, RequestDelegate next) { var claims = new List<Claim>();
// Authorize after the user has been authenticated by App Service Authentication Service if (context.Request.Headers.ContainsKey(XMsClientPrincipalIdp)) { if (context.Request.Headers.ContainsKey(XMsClientPrincipal)) { var clientPrincipal = JsonConvert.DeserializeObject<JObject>( Encoding.UTF8.GetString(Convert.FromBase64String(context.Request.Headers[XMsClientPrincipal].FirstOrDefault()))); foreach (var claimObj in clientPrincipal["claims"].ToObject<JObject[]>()) { claims.Add(new Claim(claimObj["typ"].ToString(), claimObj["val"].ToString())); } }
context.User = new ClaimsPrincipal(new ClaimsIdentity(claims));
// authorization steps var groups = await GetTransitiveGroupMembershipAsync(context);
var allowedGroups = this.configuration .GetSection("Authorization:SecurityGroupsToRoles") .GetChildren();
var claimsIdentity = context.User.Identity as ClaimsIdentity; foreach (vargroupin allowedGroups.Select(x => x.Key).Intersect(groups)) { var roles = this.configuration .GetSection($"Authorization:SecurityGroupsToRoles:{group}") .GetChildren() .AsEnumerable(); claimsIdentity.AddClaims( roles .Select(r => new Claim(ClaimTypes.Role, r.Value)) .Where(r => !claimsIdentity.HasClaim(ClaimTypes.Role, r.Value))); }
var requestUrl = context.Request.PathBase.ToString() + context.Request.Path.ToString(); if (!CanAccessApi(context.User, requestUrl)) { context.Response.StatusCode = StatusCodes.Status401Unauthorized; await context.Response.WriteAsync("User is not authorized"); return; } }
Another key function we called from the above code is GetTransitiveGroupMembershipAsync, which we call the Microsoft Graph API to figure out the user’s belonging security groups. Microsoft Graph API provides REST APIs to retreive information and our app service delegates the users to query Graph API so you will see we need to get a new token for this very purpose in the code. Of course, you need to add Read Directory Data permission to your Azure Active Directory Application.
privateasync Task<IEnumerable<string>> GetTransitiveGroupMembershipAsync(HttpContext context) { var claimsIdentity = context.User.Identity as ClaimsIdentity; var upn = claimsIdentity.FindFirst("http://schemas.xmlsoap.org/ws/2005/05/identity/claims/upn")?.Value; var url = $"https://graph.windows.net/microsoft.onmicrosoft.com/users/{upn}/getMemberGroups?api-version=1.6"; var data = JsonConvert.SerializeObject(new { securityEnabledOnly = true });
// setup a new authentication session var authenticationContext = new AuthenticationContext(this.configuration["AzureAD:Authority"]); var clientCredential = new ClientCredential( this.configuration["AzureAD:ApplicationId"], this.configuration["AzureAD:Secret"]); // get user's current access token StringValues accessToken; context.Request.Headers.TryGetValue("Authorization", out accessToken); if (accessToken.Count == 0) { returnnew List<string>(); } else { // get Azure AD Graph API token from the user's current access token var token = accessToken.First().Split(newchar[] { ' ' })[1]; var userAssertion = new UserAssertion(token, "urn:ietf:params:oauth:grant-type:jwt-bearer", upn); var authenticationResult = await authenticationContext.AcquireTokenAsync( "https://graph.windows.net", clientCredential, userAssertion);
using (var client = new HttpClient()) { client.DefaultRequestHeaders.Add("Authorization", $"Bearer {authenticationResult.AccessToken}"); var response = await client.PostAsync( url, new StringContent(data, Encoding.UTF8, "application/json")); var content = await response.Content.ReadAsStringAsync(); return JsonConvert.DeserializeObject<JObject>(content)["value"].ToObject<List<string>>(); } } }
In summary, we can put everything together into a Aspnet Core Middleware where you can plugin to your Aspnet Core application easily to deal with the authorizations in Startup.cs. Ideally, if you are building the micro-services for a number of services, you should put the authorization at your front door, so all the micro-services do not need to worry about the user authorization at all.